Tuesday, April 19, 2011

#288 Leek Pie

I beseech you heartily, scurvy, lousy knave, at my desires, and my requests, and my petitions, to eat, look you, this leek: because, look you, you do not love it, nor your affections and your appetites and your digestions doo's not agree with it, I would desire you to eat it....if you can mock a leek, you can eat a leek.
William Shakespeare, Henry V
 I like to get a bit of Shakespeare in whenever I can.

There’ll be no mocking of leeks on this blog. They are one of my favourites, though I don’t really eat them that often. The main reason, I think, is that no matter how much I wash them before preparing them, there is always some grit – invisible to the naked eye – that ends up in the final dish. I’m always so thorough too. Hey-ho, a bit of dirt is fine. In fact there’s an old Yorkshire saying: tha’s got to eat a peck o’muck before you die. Indeed.

Here’s a pie that sounds great – leeks, cream and bacon in pastry. Nothing can be bad about this one, with or without grit.

I assumed that this recipe was a Welsh one, but no, variations of it are found across Britain and France. Grigson doesn’t say that much about it, other than in France onion and flour are added to the filling, so technically this is the French version, but let’s not split hairs.

To make the pie, you’ll need to buy or make some shortcrust or puff pastry. I made some shortcrust. You’ll need to make a shortcrust that uses 10 ounces of flour and five of fat; I did eight and four respectively and only just managed to get away with it.

To make the filling, chop and onion and cook it in an ounce of butter until soft and golden. Meanwhile, trim, wash and chop a pound of leeks. Slice the green part thinly, as it is quite tough and takes longer to cook than the white part. Add the leeks to the onions along with two ounces more of butter. Season with salt and pepper. It’s important to add the salt at this point as it draws the liquid from the leeks, concentrating their flavour.


When softened and mushy, turn off the heat and add four ounces of chopped back bacon. Now measure four ounces of double or clotted cream – weight, not volume – and beat in a teaspoon of flour. Pour this over the leeks and bacon and allow to cool.


Roll out two thirds of your pastry and line a nine inch tart tin. Add the filling and roll out a lid with the remaining pastry, using beaten egg as a glue. Crimp the edges and ‘decorate in restrained manner’. I just made some fluting around the edge. Brush with egg and make a hole in the centre so the steam can escape. Bake for 15 minutes at 220°C (425°F) or until the pastry is nice and brown, then turn the heat down to 180°C (350°F) for another twenty to thirty minutes.


#288 Leek Pie. What a great pie! The filling became a rich and delicious mush with subtle onion and leek flavour. The secret to this – as with so many of the best in English Food – is the that are just a few ingredients cooked slowly over a low heat with a good amount of seasoning. It was just as delicious cold as it was hot. One of the best recipes thus far I’d say. Go and cook it! 9.5/10.


Sunday, April 17, 2011

#287 Scotch Woodcock

Here’s a quickie that was a popular savoury in Victorian times in the same vein as Locket’s savoury and Gloucester ale and cheese. None of them are really eaten these days, though most of the time they are very tasty (though also very rich; no wonder everybody had gout). Although such savouries were served at the end of a meal in those days, it is is perfect for a first course or as a light lunch these days, I reckon.
It doesn’t contain any actual woodcock, of course, but is basically anchovies and eggs on toast – the fish and eggs being a substitute for the prized game bird. Just like how Welsh Rabbit is really cheese and bread instead of the delicious meaty mammal.
This recipe makes six woodcocks:
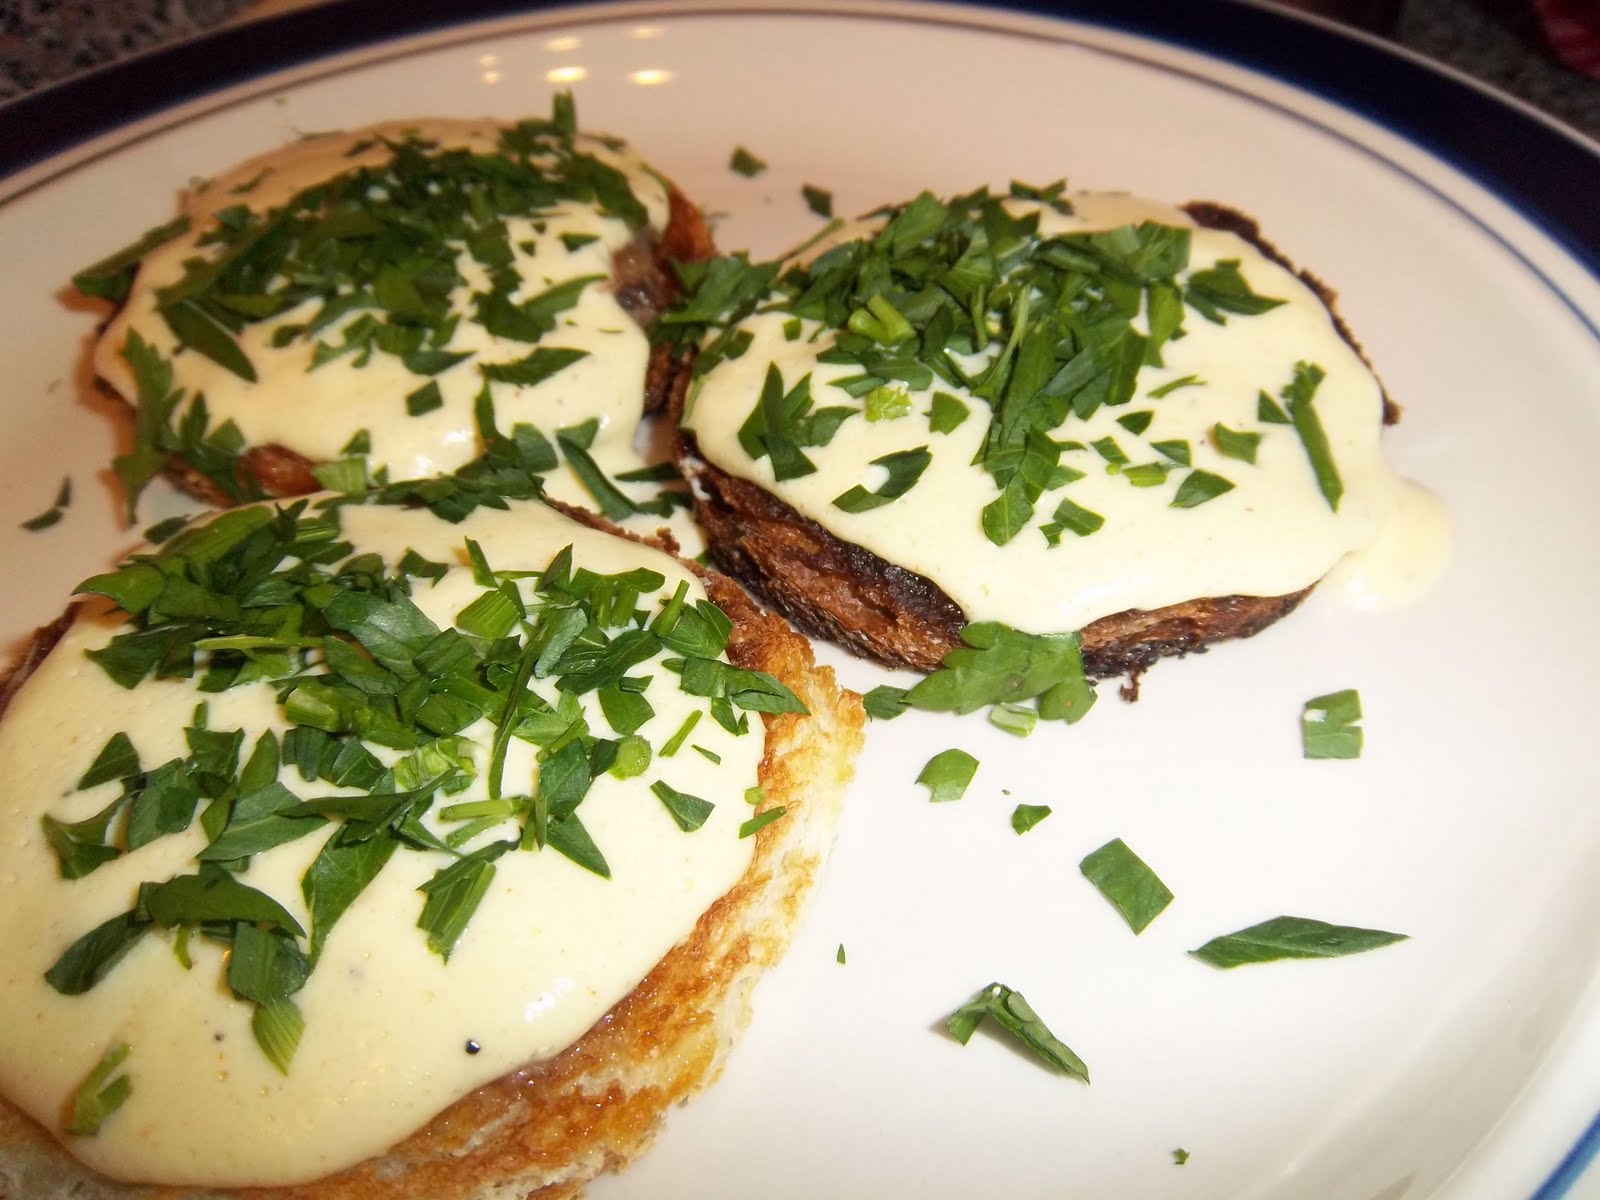
Start by draining a tin of anchovies before mashing them with two ounces of butter. Next, get the toast ready – cut circles out of six slices of bread and toast them on both sides. Spread with butter and then the anchovy mixture. Keep warm whilst you make the eggy sauce. In a saucepan, add two egg yolks to half a pint of whipping or double cream. Beat the yolks and add pepper a little salt and a good pinch of Cayenne. Stir over a moderate heat until the sauce thickens. Spoon over the anchovies, add a flourish of chopped parsley and serve it forth. If you don’t fancy making the thickened cream sauce, make some softly scrambled eggs made with a bit of cream instead.
#287 Scotch Woodcock. Previous anchovy-based recipes in this blog have ranged from the most delicious to the worst and most bizarre. This one however can join the ranks of the delicious. The intense saltiness of the anchovies was balanced very well with the bland creamy sauce. Very, very good. I ended up eating three and it gave me stomach ache. Hey-ho, you’ve to take the rough with the smooth in life aintcha? Tres bon, 8/10.

Tuesday, April 12, 2011

#286 Candied Peel

From the odds and sods part of the last chapter of the book this one. I’ve never been particularly moved to make candied peel because I usually bake cakes on a whim and don’t really consider thinking ahead and making the chopped peel required for fruit cakes et cetera. This has all changed now I am in the United States of America. If you buy candied fruit for your cakes here they will not only contain citrus peel but also invariably a good proportion of glace cherries and pineapple. Now don’t get all tetchy America; I’m not dissing your candied fruits. Sheesh! In fact I prefer your version, but it’s just not English now, is it? And that simply will not do for the purposes of my blog.
This recipe uses the peel of two grapefruit or one ‘large, fine’ pomelo (you can get these at Asian supermarkets pretty easily) or four oranges. Slash the skins and remove the peel, pith and all. I suppose it’s a good way of using up the peel of citrus fruits instead of just throwing them away. I suppose you can follow this recipe and candy pretty much anything you like. Lemons would work. Or citrus slices. I once saw loads of whole candied fruits like plums and peaches and things like that for sale in Harrods at extortionate prices.
Back in Tudor times, people went crazy for candied fruits and it is during these times when recipes for mince pies and Christmas pudding were borne. This was due to the sudden supply of sugar from sugar cane from the West Indies. A very popular dish at the time was sweet custard tart with candied fruits and candied fish! The fools. Plus, to have black teeth was very much the rage; this meant you could afford to plenty of sugar!
Once you have removed the peels, boil them, covered, for a good fifteen minutes. Drain them and repeat this process once, twice, or thrice again until the peel is tender and the bitterness is ‘at a palatable level’. Now drain them and let them cool.
 Now either leave them as they are or cut into strips. You can use the strips as an after dinner sweetmeat if you like. If so cut them into nice neat long rectangles if you want to do that. Dissolve ten ounces of white sugar in a quarter of a pint of water in a saucepan over a medium heat. Bring to the boil and add the peel. Boil steadily, stirring occasionally until all the syrup has been absorbed. This takes around half an hour.
Now drain the peel in a metal sieve and then leave to cool, spread out on kitchen paper.

Keep them in an airtight tub and chop whenever required for cakes. You can roll them in some more sugar or dip them in melted chocolate to serve with coffee if you like.
#286 Candied Peel. I quite enjoyed making these – quite a therapeutic process; just right for a Sunday afternoon activity. Easy too – I was expecting it to be tricky. I was imagining a spluttering tub of boiling sugar and third degree burns, but it was all quite tame. I haven’t used them for anything yet, but I did have a taste and they were very, very good. Very sweet of course, but still had lots of zesty zing left in there and a million miles away from the bought stuff. What shall I candy next? Suggestions below please! 8/10.

Wednesday, March 23, 2011

#285 Creamed Parsnips

Parsnips don’t seem to be that popular in America, at least compared to Britain. In the USA, carrots and sweet potatoes are much more favoured as a sweet-starchy vegetable. In Europe, parsnips have been cultivated since Roman times, and although in the UK, the wild parsnip is quite a common plant, it has rather pathetic roots,and isn’t worthwhile eating. The parsnips eaten in Britain are therefore not indigenous. They were probably brought over around AD55 during the Roman invasion. The Romans used parsnips in desserts because of their sweet and chestnutty flavour, weirdly, parsnips are used in a cake in English Food that is based upon the recipe for an American carrot cake. Ah, the circle of life.
The European wild parsnip

Creamed parsnips can be served alongside some roast meat, or on their own with toast or in pastry cases as a supper dish, says Griggers. I had them for supper.
Peel, top, tail and quarter a pound and-a-half of parsnips. Remove any woody parts, if the parsnips are large and cut them into batons. Plunge them into boiling, salted water and allow to cook until tender – between five and ten minutes, depending upon the size of you batons. Drain and return to the heat. Stir in a quarter of a pint of double cream (or half-and half double and single). Heat through, season with salt and pepper and stir in some finely chopped parsley. Serve hot.
#285 Creamed Parsnips. Ah the simple things are the best, innit? These were delicious and not at all heavy – the parsley lifted the whole thing, preventing the dish becoming sickly. The creamy sauce and the carby parsnips themselves made the supper feel quite substantial. A hidden, simple gem. 8/10.


Saturday, March 19, 2011

#284 Veal, Ham and Egg Pie

Okie dokie, so the last two posts have all been on the subject of raised pies. The first one explained how to bake and construct one, and the second explain how to make the jellied stock. Now it is time for an actual filling to complete the full recipe.
This is the first of several fillings for raised pies from the book, and I must admit that I have been putting off making one in case it was a disaster. In the end it was a delight to make.
I chose this recipe because it seemed the most basic, with the easiest ingredients to get hold of; the nearby Central Market sells a range of veal cuts, which are usually tricky to get hold of. Strangely enough, the tricky item to get hold of was the unsmoked and raw ham, gammon or bacon. I searched high and low for it, but to no avail. Luckily, I am now pretty good in the kitchen these days and knew I could cure my own ham overnight in the brine tub I now have sitting at the back of the fridge ready to leap into action whenever I need an emergency curing. I bought a bit of pork loin as it is the leanest cut.
So, to make the filling you will need to hard boil and shell four eggs. Whilst they are bubbling away, get the meats ready: cut up 1 ½ pounds of ‘pie veal’ (I took this to mean cuts for casserole, like shoulder) along with 12 ounces of unsmoked bacon, ham or gammon. You want chunks around a centimetre in size. Add the grated rind of a lemon, a tablespoon of chopped fresh parsley, a teaspoon of dried thyme. Mix these together well with a decent  amount of seasoning. Pack half of the mixture in the pastry-lined mould. Place the eggs inside and then the remaining filling (see the raised pie post for pics of this). Then bake as described in the raised pie post.

#284 Veal, Ham and Egg Pie. Whew! This pie pretty much took me a whole Sunday to make. It was worth it though. The filling was wonderfully light and fresh tasting due to the herbs and lemon and the meat flavour was quite subtle, the whole thing kept moist by the jellied stock. The pastry was crisp and tasty too – hot water pastry is so easy, I can’t believe I put it off for so long. I brought it into work for people to try and it seemed to go down pretty well and I’ve been eating it through the week. There’s one slice left know, and I already miss it. Cannot wait to try the next one. I think i have found my calling as an artisan pie-maker extraordinaire! An excellent pie! 8.5/10 (I’m not marking it higher, in case the others are even more delicious!).

Friday, March 18, 2011

#283 Jellied Stock

If you are going to attempt to make a raised pie, then you need to make a jellied stock. The jelly in these pies is either loved or hated. Many people can’t stomach the thought of savoury jelly I think and either have to pick it out or avoid eating these delicious pies altogether. The jellied stock is very important though. The meat inside is cooked for a long time and can dry out a little – some water escapes through the hole in the top and some is absorbed by the pastry. The stock soaks into the meat, making it nice and juicy again and it fills any gaps made by the shrinking contents.
So here’s the recipe. You could, of course, just use some stock and gelatine, but that would be cheating!
First you need some bones that will release alot of gelatine, so use either two pig’s trotters or a veal knuckle – ask the butcher to cut them into several pieces for you. To these, add any bones you may have left over when you prepared the fillings. You’ll also need a sliced large carrot, a medium onion studded with three cloves, a bouquet garni and twelve black peppercorns. Place all of these in a big stockpot.

From this...

Now add four to five pints of water, bring to the boil, skim off any scum and cover and simmer for three to four hours.

...to this...
Strain the stock through some muslin into a clean pan and boil it down until it is a concentrated ¾ of a pint. Season it with some salt and more pepper if required. The stock is now ready to be funnelled or poured into the raised pie (see here for instructions).

...to this!

#283 Jellied Stock. I won’t write a review for this as it’s not a dish in itself, but I will say that it was a very satisfying process; condensing that big set of ingredients into the viscous well-flavoured stock. Made me feel like a real baker.

Thursday, March 17, 2011

#282 Raised Pies

Is there anyone who doesn't like a pie made with hot-water pastry? Everyone, I say, from the Mayor of Melton Mowbray to, er, Sweeney Todd. Oh, except for vegetarians. They’re so quintessentially English and I’ve not seen anything remotely close here in Texas. I must admit I’ve been putting off making these pies – I’d never made one before and I knew that it would take a lot of time, and presumably, effort. However, I felt I was ready – and so I should be because there are several to do in this book so I need the practice. Hopefully I’ll get it right first time.
So, for those of you not in the know, a raised pie is a pie made from pastry using boiling water and lard, unlike shortcrust pastry that is kept as cold as possible. Hot water pastry achieves a putty-like consistency that allows the pie mould or tin to be moulded and raised up the sides of the tin, rather than rolled. The hot water makes the pastry very absorbent too; you need this as the filling cooks and releases juices. Normal pastry that contains butter would just turn into a sloppy mess. Raised pies became crazily over-the-top in the seventeenth and eighteenth centuries. Elizabeth Raffald’s receipt for a Yorkshire Goose Pie gives the following instructions:
‘Take a large fat goose, split it down the back and take all the bones out. Bone a turkey and two ducks the same way, season them very well with pepper and salt, with six woodcocks’
You don’t get pies like that in Yorkshire nowadays, I can tell you. Imagine the meat sweats you’d get from a slice of that!
The raised pie hasn’t quite fallen out of favour in Britain these days – I’m sure Melton Mowbray pork pies are as popular as ever, but that’s all you generally see now. The book proffers more, and I shall be adding them as I go. The basics are: Pork Pie; Veal, Ham and Egg Pie; Raised Mutton Pies; and Game, Chicken or Rabbit Pie. They all have the same basic parts: the pastry, the jellied stock and the filling itself.
It all seems a bit complicated, but it’s not really. In this post I’ll deal with the construction and baking of the pie. The jellied stock and the fillings can have their own posts (these are coming in the next day or two).
Begin by making the hot water pastry. Bring a third of a pint of water and six ounces of lard to the boil. In the meantime, weigh out a pound of flour and place in a bowl with half a teaspoon of salt. When boiling, tip the water and fat into the flour and mix quickly – electric beaters are the best for this, but don’t use a high speed as the pastry won’t bind properly. To enrich this pastry add an egg, or a tablespoon of icing sugar. Cover the dough and leave until it cools enough to handle, but don't let it cool down completely. Take three-quarters of the pastry and put it in a six or seven inch cake tin with removable base. You can buy fancy hinged raised pie moulds – they are quite expensive though, but they are beautiful (see this link). Quickly, but carefully, mould the pie by gently pushing the pastry up the sides of the mould or tin until it overlaps the lip, making sure there are no holes or tears. If it just flops down, then it is too hot. Wait five minutes and try again.

If you want to make small pies, you can mould the pastry around the outside of a wide rolling pin or a jam jar. This method is required for the mutton pies. This is alot trickier apparently. So unless you can avoid it, do the big pie.
Now you can start on the jellied stock and prepare your pie filling. Pack the filling well into the raised crust.

‘...if it mounds up above the rim, so much the better.’

Roll out a lid with the remaining pastry and fix in place with a little beaten egg, making a hole in the centre for steam to escape. Decorate the pie with leaves and roses using pastry trimmings. It’s strange that savoury pies have the ornate decorations in England and that the sweet ones are left plain. I don’t know why this is. Anyway.... Brush the lid with more egg (don’t throw unused egg away, you’ll need it later).

Bake in the oven for half an hour at 200°C (400°F) to colour the top, and then lower the temperature to 160°C (325°F) for two hours for large pies and just one hour for small pies – you need this time for the meat to cook and become tender. Watch the pie doesn’t brown too much though – if it needs a little protection, cover with some brown or wax paper. Remove it from the oven and leave it to cool for thirty minutes before removing it from its mould very carefully. Brush the sides with beaten egg and return it to the oven for a final half an hour to brown and crisp up.

Whilst the pie cooked, the meat shrank, so the gaps need filling with the jelled stock. This can be carefully poured through the hole in the lid, or better using a small funnel. Let the pie cool and eat the next day. The pie will keep for days wrapped in wax paper and kept somewhere cool.
Phew!
#282 Raised Pies. It won’t write a review for this recipe – I’ll save that for the fillings. However, it is worth saying that although making a pie like this is no mean feat, it is worth having a go. I had such fun pottering about the kitchen making my first riased pie (the Veal, Ham and Egg Pie). But then, I am a great big geek. Anyway, hopefully I have inspired you to give it a go, if not at least appreciate how much effort goes into these beautiful and delicious artisan pies.

Sunday, March 13, 2011

#281 Scallops with White Wine and Jerusalem Artichokes

If I am going anywhere that is likely to have lots of nice food, I take my copy of now dog-eared English Food along with me in case there is something I don’t expect to see but is required for a recipe. Central Market, the place where I seem to get most of my ingredients from here in Houston, almost always has something unexpected I can use. Today was no exception: I was shopping for some pie ingredients, but also came across some nice Jerusalem artichokes. A quick flick through the book and I found this recipe that combines them with one of my favorite items of seafood, scallops. I was in the mood for treating myself, so I thought this would be a great late lunch dish prefect for these warm days in Houston.
This recipe isn’t one of Jane Grigson’s herself, but from one of her contemporaries and friends Joyce Molyneux, who owned a restaurant called The Carved Angel in Dartmouth. Ms Molyneux adapted the recipe from a recipe she saw for scallop and Jerusalem soup in a book called Four Seasons Cookery Book by a certain Margaret Costa. It’s funny how recipes get changed and passed around, constantly evolving into different dishes.
To make a lunch for four you will need eight large scallops. Remove the corals (should they still be on) and reserve them and cut each scallop into five or six discs. Now trim about twelve ounces of Jerusalem artichokes and cut them into thin matchsticks (keeping trimmings for soup, Griggers says). Fry them gently in two ounces of butter and when nearly tender – about ten minutes – add the scallop discs and four tablespoons of dry white wine. Season with a little salt and pepper. After a minute, add the corals and cook for another two minutes. Don’t overcook – they will become like rubber. Arrange the scallops and artichokes on a warm plate and concentrate any remaining juices, seasoning with more salt and pepper if you like plus some lemon juice. Finally, stir in some chopped parsley and pour over the scallops. I served them with some nice buttered sourdough bread, thinly sliced.
#281 Scallops with White Wine and Jerusalem Artichokes. I loved this. One of the best recipes I’ve done in a while. The earthy artichokes worked so well with the sweet scallops, plus the wine, lemon and parsley really made the whole thing wonderfully fresh tasting. Mopping up the sauce with the bread was the perfect finish. Excellent. 9.5/10.

Friday, March 11, 2011

#280 Welsh Cinnamon Cake

Known as Teisen Sinamon in Welsh, this is a mysterious cake. Griggers doesn’t really give any history behind it in the book. She says that the recipe is by Mrs Bobby Freeman (who has written a book of Welsh cakes and buns). She also says that it’s bit of a pity that chefs don’t make traditional dishes enough in their restaurants anymore. I did find after a little research that is a Victorian recipe – thanks Victorian Recipes of Wales teatowel! I’m not actually sure if it is a cake – it’s more like a giant biscuit with some meringue on top. Quite American really.
I made this cake on request for my mate Chandra’s birthday the other day. I think it went down quite well at work.
Cream four ounces each of butter and sugar in a mixing bowl and then beat in two egg yolks (reserve the whites!). Sift eight ounces of plain flour, a rounded teaspoon of cinnamon and half a teaspoon of baking powder and mix them in stages into the creamed butter and sugar. Knead this mixture together and roll it out to line a nine inch flan tin with a removable base. Actually rolling it out is a total pain in the arse because it breaks up very easily. Instead spread it out over the base of the tin using your knuckles, pushing the dough up the edges and make it neat using the edge of a measuring cup. Bake for 20 minutes at 200°C (that’s 400°F). Remove from the tin and cool on a wire rack. Heat some apricot jam with a little water to make a glaze and paint it thinly over the cake. Remember those two egg whites? Add another one and whisk until the stiff-peak stage. Then add three tablespoons of caster sugar and whisk again until the meringue becomes silky and creamy. Pile into the centre of the cake and make decorative swirls and spikes. Bake again at 180°C (350°C) until the meringue is a nice golden brown – about 10 or 15 minutes. Take out and cool on the rack again.
#280 Welsh Cinnamon Cake. Is it a cake? Is it a cookie? We just don’t know. It was very nice though – plenty of warm cinnamon spice. It was a bit stodgy too, but in a good way. I’m not sure about the meringue topping though. Not a bad one, by any means. 6.5/10.

Tuesday, March 8, 2011

#279 Apple Sauce II

I still had sausages left over from Harrison Hog Farm – I ate half of them with Crempog Las and wanted to the give the rest the Grigson treatment. I could have gone with toad-in-the-hole or something, but I’d done that already. Luckily I spotted this apple sauce recipe which can be served with sausages (as well as pork, salt pork, duck and goose). What made me want to do this recipe is that allows one use sausage as the meat in a Sunday dinner rather than a roast meat which can be a pain to do if there is a lot going on in the day. So it’s good old sausage and mash for dinner.
The recipe asks for Cox’s Orange Pippins, Laxtons or James Grieve apples. These are not available in America (as far as I know), and so for any Northern Americans amongst us (and I know there are several), go for Mackintosh apples instead – they have the tart mealiness of a Cox’s Pippin.
There are several apple sauce recipes in English Food and I have now hit a bit of a brick wall – the remaining recipes all use Bramley’s seedlings which can’t be found in the USA, and I haven’t been able to find an appropriate alternative. If anyone has any suggestions, let me know!
Roughly chop 12 ounces of apples – no need to peel or core them. Add them to a saucepan along with a strip of lemon peel and 3 ounces of water (by weight!). Cover and simmer until soft. Pass them through a sieve into a bowl, forcing the apple flesh through to produce a smooth puree. Return to the saucepan and simmer quite briskly until the puree thickens and starts to spit and bubble a little. Stir in an ounce of butter and season with pepper and a little salt, but only if the butter was unsalted.

#279 Apple Sauce II. A slightly strange sauce this. I liked the fact it was unsweetened – bought apple sauces are far too sweet I think and they don’t always do a good job of cutting through the rich, greasy meat it’s usually served with. The butter enriched it but didn't make the whole thing sickly like I expected. A good sauce, but nothing to write home home about! 5.5/10.

Monday, March 7, 2011

#278 Crempog Las

Well Shrove Tuesday is almost here, so I thought I’d provide a pancake recipe from English Food. This one is perhaps a more alternative recipe as it is most definitely savoury rather than sweet, and best served up with sausages, bacon and eggs as a breakfast dish rather than for a Pancake Day evening pig-out. In America, people seem to be having much more fun with their Mardi Gras celebrations...
The Welsh seem much more adept at pancakes than the English and I suppose that’s why there are so many Welsh recipes in the Pancakes and Griddle Cakes section of the Teatime chapter of the book. If they weren’t counted, there would be slim pickings. Crempog Las, by the way, translates as green pancakes in Welsh (check out this site for more information on this dish and other Welsh dishes). I didn’t have high hopes as there has been a bad run of recipes from this section…
The other reason why I wanted to cook these pancakes is that I found a pack of sausages that I bought from Harrison Hog Farms. They have a stall at the Rice University Farmers’ Market and breed pigs that look suspiciously like Gloucester Old Spots; a fine old English breed, so I thought they can’t be bad. Naturally, I put in them in the freezer and promptly forgot about them. Even though I have only been in my Texan apartment for five months, I have managed to almost fill my freezer with bits that I see in shops and left overs like wine, egg whites, breadcrumbs and what-not that I expect one day will come in useful. I decided that it needs emptying. It is for the same reason that later on this week I will be doing oxtail soup.
Anyways, I have wittered on far too much:
Using a whisk, mix together four ounces of plain flour, a large egg, a dessertspoon of finely chopped parsley, a heaped teaspoon of finely chopped shallot and enough milk to make a thick batter. Season with salt and pepper. Fry the pancakes in some oil or grease  over a moderately-high heat until golden brown – two or three minutes a side should do it. That’s it. Serve with butter or as part of a fried breakfast.
#278 Crempog Las. These were delicious! A subtle savouriness from the slightly sweet-acrid shallot and the grassy freshness of parsley made them very morish. I am definitely adding these to my breakfast arsenal. Give them a try, they are so very, very easy. 7.5/10.

Sunday, February 27, 2011

#277 Hazelnut Stuffing for Poultry and Lamb

I mentioned in the last post that people don’t make their own gravy anymore, well the same goes for stuffing. I have to admit, I don’t often make stuffing for roast poultry normally, though I have for the blog before. Every time I do, it comes out delicious and is always better than even the poshest pre-made supermarket pap. So I thought I was well overdue making some (which I think is also called dressing in the USA, non..?).
This one, I thought looked interesting – with its earthy hazelnuts and piquant-sweet preserved ginger; just the thing for a climate that is never really wintry. After all, the main reason that I haven’t cooked more food like this in Houston is because it is so bloody hot all the time and I don’t necessarily want roast meats. Anyways, this one seemed good and light and reasonably summery.
Griggers makes a point of highlighting the quality of hazelnut required for the recipe – pre-roasted and chopped hazelnuts are fine, she says, but you really want some slow roasted whole Italian ones from Avellino near Vesuvius, where they have been grown since Roman times. I’ll just pop over and fetch some. I couldn’t get those of course, but I did get Roman ones, so that pretty good I reckon, bearing in mind where I am!

Julian of Norwich with Hazelnut. For some reason.
If you want to be truly old-school, you can use cobnuts, which can still be found growing around the southern counties of England, in particular Kent. FYI: cobnuts were the original nut used in the game of conkers before the horse chestnut was introduced into Britain.
Stuffing is the easiest thing in the world to make. To start chop a large onions and soften it in two ounces of butter – keep it on a medium heat with a lid to prevent to browning. Once cooked, add the following ingredients in the following order: four ounces of fresh breadcrumbs; two ounces of toasted, chopped hazelnuts; four knobs of preserved ginger*, chopped; grated rind of half a lemon; the juice of a lemon; one large beaten egg; salt and pepper; and two tablespoons of chopped parsley. Now you can use the stuffing for whatever you like. If this is for turkey, you may need to double, or even treble the amounts given here.
If you are using it to stuff a bird, make sure you weigh it after it has been stuffed so you can include the extra weight in the cooking time.  Also, it is best to stuff the neck end rather than the cavity, as the stuffing doesn’t go stodgy; just loosen the skin and stuff it in, securing it all by folding the neck skin under the bird. Any left can go into the cavity – but only pack it loosely.


*If you can’t get preserved ginger then use ginger preserve (i.e. ginger jam), or miss it out entirely and replace it with the chopped liver of the bird(s) and a heaped teaspoon of thyme.
#277 Hazelnut Stuffing for Poultry and Lamb. Absolutely delicious and definitely the best stuffing so far in the book! It was sweet and earthy and the nuts had gone wonderfully soft and translucent, giving out their flavours into the rest of the mixture. The lemon and ginger lifted it all very well and stopped it from being too heavy. This is going into my everyday repertoire. 9/10.

Saturday, February 26, 2011

#276 Giblet Gravy

It’s such a shame that the art of gravy making has been lost. This gravy is rather posh, containing things like veal and vermouth. You don’t need to add these sorts of things every time you make it, but even basic gravy is so much more delicious than any from a packet. I know it takes more planning and time, but it’s not that difficult really – mainly a bit of simming. I haven’t used gravy granules for a good couple of years now…
I’ve been meaning to do this recipe for ages – but finding chickens with giblets these days is difficult in Britain. The reason being, apparently, that people would keep forgetting to remove the giblets in their little plastic bag from the carcass before roasting it. Idiots ruining things for the rest of us, as per usual! It is also difficult finding veal in Britain too. In America however, it is pretty common. However both chickens with giblets and veal are everywhere. So I invited my friend Danny round for a roast dinner – the first I’ve made since the move over here. I don’t know why I put it off, the heat I suppose. Roast chicken and stuffing (see the next post, when I write it!) with Yorkshire puddings (my recipe here, Grigger’s here) and mashed potatoes are as manna from the Gods as far as I’m concerned. Danny had never had Yorkshire pudding before. What is that about!?
To make the gravy you’ll need a set of turkey giblets or two sets of chicken giblets – Grigson says to not include the liver, but my Mum always used it for hers and it’s good gravy that she makes! – two quartered carrots, one halved onion, either a quarter of a pint of dry white wine or 90 mls of dry white vermouth (I went with the former), a bouquet garni (see here for a post on what should go in a bouquet garni), and eight ounces of casserole veal that has been cut into pieces. Put all these ingredients into a saucepan over a high heat. When the alcohol has boiled up and the giblets and veal has changed colour, add two tomatoes that have been halved plus enough water to just cover things. Season with salt and pepper. Cover and simmer for two hours. Strain the stock.
In another pan, melt and ounce and-a-half of butter and let it cook until it turns a golden brown – a noisette brown as it is called in the trade, a good name because it does change its aroma as well as its colour and a definite nutty smell emanates. This change happens quite quickly so don’t take your eye off it. Now stir in a level tablespoon of plain flour (you can add more if you like a thick, thick gravy). Pour over the hot stock and allow to simmer covered quietly for a further half an hour. Check the seasoning.
If you are making a chicken gravy, add the juices from the roasting pan (as I did). For turkey, pour the fat away and add a glass of Madeira wine to it. Boil it up and serve it separately from the giblet gravy.
Check out that layer of butter settling out there!
I can't believe I had no gravy boat; how embarrassing.


#276 Giblet Gravy. This was a long time coming, and it was certainly worth the wait. Rich and satisfying with a good herby flavor from the thyme I added. The best gravy I have ever made that for sure – and definitely the most indulgent. The veal, by the way, didn’t go to waste, I fished them out and serve the chunks with the meal. Waste not, want not! Anyways, an excellent recipe – 9/10.

Sunday, February 20, 2011

#275 Pears in Syrup

"Your old virginity is like one of our French withered pears: it looks ill, it eats dryly." Bertram, As You Like It

    
What a great quote. Shakespeare was such a bitch.

This is an old, old recipe that Griggers herself has updated rather. In Medieval times a variety of pear called Wardens were used that were rock hard and required an hour’s cooking beforehand. These days, we use eating pears so it’s a lot quicker to make. It is best though to use unripe pears for this, though it doesn’t really matter what kind.
I chose to do this recipe as the dessert to a vegan meal I cooked with my good friends Danny and Eric. I was quite surprised that there was anything vegan in the book! In fact, of the remaining desserts this was the only one.

A some of you may know, one of my gripes is picky eaters. Vegetarianism and veganism don't come under that term ofr me though. I think making a moral stance against eating animals or using the products of animals certainly has a lots of merit. Not eating honey is a bit stupid though. Anyway, what IS annoying is veggies who ARE picky. I mean, what is the point of restricting your diet if you don't like most stuff anyway. Luckily noone fell into that category this night!
It’s an easy recipe that can be done well in advance.
Start by peeling, halving and coring the pears – you will need one per person according to Jane. Pop them in a pan in a single layer and pour over enough red wine to cover them. Add too, two tablespoons of sugar, a cinnamon stick and a good pinch of ground ginger. Cover them and bring to a simmer until they are nice and tender. This takes a good 25 minutes, but the time will depend on the variety and ripeness of the pears used. Remove the pears with a slotted spoon and keep warm whilst you boil down the wine until you get a nice slightly syrupy sauce. Add more sugar if you like. Pour over the pears and allow to cool. No need to serve anything else with them.


[If you don’t want to use wine, it can be adapted – swap the wine for water and the cinnamon for a split vanilla pod and add one sliced quince for every two pears cooked. Cook the fruit slowly to achieve a honey scented deep red sauce.]
#275 Pears in Syrup. This was a really good dessert. I’d actually put this one off because I expected to dislike it, but was totally wrong. The concentrated red wine sauce wasn’t heavy or sickly like I thought it would be, but light and refreshing. It must have been the pears and the spices that lightened the whole affair. That said, we could only manage half a pear each. The pudding looked quite impressive too with the dark, almost indigo sauce and the creamy-white pear flesh inside. Great stuff. 8/10.

Tuesday, February 15, 2011

#274 Saffron Cake from Cornwall

"A man who is stingy with saffron is capable of seducing his own grandmother." Norman Douglas, 1848-1952
It goes without saying that saffron is a wee bit pricey. Only three tiny stigmas are plucked from each autumn crocus which means that a pound of saffron strands requires up to 75 000 flowers and can cost up to £2500 per pound in the UK and $5000 per pound in the USA. Lucky for us it is very pungent and is only needed in very small amounts. I bought a small packet for about $10 which I have used in a few dishes already like the Fifteenth Century Apple Fritters and the Coronation Doucet. In days of yore, if you wanted to impress your guests and flash your cash a bit, you couldn’t go far wrong by sprinkling some saffron your pottage or whatever. The long-distance trade in saffron goes all the way back to the second millennium BC at least and there has even been a war over it. It was also thought to cure the black plague. For this recipe it takes centre stage, and so it should, I love the stuff though it wouldn’t necessarily lead me to fisticuffs...

The saffron flower

For some reason saffron isn’t used that often in English cuisine – I only really see it pop up in Asian food and in fishy things like paella. However, it has hung on in the form of this bread from Cornwall. I’d not heard of it myself, but it is interesting in that this recipe predates the invention of raising agents such as baking powder, so to make it light, yeast is used. Because it’s fermented, it appears in the bread section of the book rather than the cake section.
The evening before you want to make the cake (actually cakes, as this recipe makes two) put a generous pinch of saffron strands into a few tablespoons of warm water. It will steep and infuse to make a stunning orange-coloured scented water.
Weigh out two pounds of plain flour and eight ounces of sugar then make the leaven. For the leaven, crumble an ounce of fresh yeast into a small bowl. Pour over a quarter of a pint of warm water along with 2 heaped tablespoons from the flour and a heaped teaspoon from the sugar. Whisk everything together and leave to rise and froth up for around half an hour. Mix the sugar and flour together in a bowl and place it in the warming oven for 10 minutes or so. Remove from the oven and mix in half a teaspoon each of nutmeg and cinnamon and a pinch of salt. Now rub in six ounces each of lard and butter. This is quite easy as the flour is warm.
By now the yeast should be metabolising like a crazy thing, so make a well in the centre of the flour and pour it in alongside the saffron liquid and strands plus half a pint of warmed milk. Using your hands, mix everything together to form a dough. Cover with a damp cloth or cling film and allow to rise and double in bulk. The time this takes depends on the temperature of your kitchen.
Knock-back the dough and mix in 8 ounces of mixed dried fruit and 2 ounces of chopped, candied lemon peel and place in two greased loaf tins. Cover again and allow to prove until they have puffed up. Bake in the oven for 40 minutes at 220°C (425°F). Let them cool for a few minutes before taking them out of the tins and placing them on a wire rack.
Jane doesn’t suggest a way to eat the cake but I ate it with some cream cheese and honey.


#274 Saffron Cake From Cornwall – this was rather unusual. The cake was leavened with yeast (was that a tautology?) rather than baking powder which made it rather dense; more a cross between a tea loaf and a scone than a cake. I wasn’t sure about it at first, but it grew on me rather. The saffron flavour came through and I thought it gave the cake slightly anaesthetic properties. I expect if you ate enough you could have a root canal without wincing no problem. I brought it into work where it seemed to go down quite well, which is always nice. People scored it quite highly, but I’m a right stingy marker – 5.5/10.


Wednesday, February 9, 2011

#273 Fifteenth-Century Apple Fritters (Fretoure owt of Lente)

I do so love the old, old recipes within English Food. I do so also love anything deep-fried, so I knew I’d like this one. A tricky thing about doing some of the apple receipts in this book is that most of them ask for Cox’s Orange Pippins which are not freely available here in Texas. However, I have found an excellent replacement for those sour and slightly soft little darlings; the Macintosh apple. So from now on any American Grigsoners can do the recipes almost as Jane intended. In fact they are so similar that I think they might have been selectively bred from Cox’s.
Although just a simple recipe to us now, this must have been a pretty expensive dessert to make because of the addition of black pepper and saffron. However, these old recipes don’t exactly reflect what commoners ate in the fifteenth century – the only recipes that were written down were those chefs that could read, and that meant chefs to the King and the like. Commoners couldn’t read or write and so those sorts of recipes are much more difficult to get hold of!
I imagine Richard III probably tucked into these the day before the Battle of Bosworth Field, well actually, Henry Tudor, since he was the one that won the thing…
Peel and core six Orange Pippins and slice them thickly. Place in a bowl with a liqueur glass of brandy and a good sprinkling of sugar. Let them steep for a few hours, making sure they all get turned in the sweet brandy. Meanwhile, make the batter. Start by pouring three tablespoons of nearly-boiling water over a pinch of saffron and let it steep. Measure out four ounces of flour and mix in one whole egg and the yolk of another (save the white for later on) along with a tablespoon of oil or clarified butter. Measure out half a pint of milk and mix around half of that in too. Strain the saffron liquid into the batter and add more milk if it’s too thick along with a three gratings from the black pepper mill. Lastly, whisk the egg whites and fold that into the batter. Dip the apples in the batter and fry in oil until nice and golden brown. Serve it forth with some sugar sprinkled over it. I plopped on some lightly whipped double cream too.

#273 Fifteenth-Century Apple Fritters (Fretoure owt of Lente). These were a great end to the lobster that Danny and I cooked. The dessert was very easy too –good if people are round; you don’t want anything complex. The batter was really nice and light due to the egg white, though I couldn’t really taste the spices. No matter, because it was still a great pud! 7/10.

Sunday, February 6, 2011

#272 Melted Butter

As our Jane quite rightly points out in English Food, many old recipe books suggest serving meat, fish and vegetables with good butter or good melted butter. This is not just high quality butter melted on the food, but a butter sauce not unlike hollandaise. The main difference being that flour is used to thicken the sauce instead of egg yolks, which makes the sauce much easier to make. In The Experienced English Housekeeper by Elizabeth Raffald, there are quite a few mentions of it, but no actual receipt. The recipe given here is from The Cook’s Guide by a certain Charles ElmĂ© Francatelli who was briefly the chef at Buckingham Palace during the reign of Queen Victoria. Oh la-dee-da! (He left because he was disgusted with the filthiness of the kitchens.)
Anyways, the sauce seemed to be the perfect accompaniment to the poor old lobster I accidentally dismembered, then boiled. I’ll give the basic recipe and then the variations…
To make the sauce it is best to do the whole thing in a bain-marie or double boiler – i.e. a bowl over simmering water.  Weigh out 9 ounces of unsalted or lightly salted butter – Griggers suggests using a good Danish butter – melt one third of it in the ban-marie with some pepper and nutmeg. Next, stir in an ounce of flour and ¼ pint of cold water, using a whisk to prevent lumpiness. Heat until the sauce is at simmering point, then turn the heat right down and leave for 20 minutes for the sauce to thicken. Now beat in the rest of the butter piece by piece using the whisk. Add any flavorings you want at this point (see below for some suggestions). Season with lemon juice and salt, plus more pepper if required. Lastly, add a tablespoon of double cream for richness.
Flavorings:
Shrimp sauce – add some brown shrimp to the sauce at the end; use fish stock instead of water if you like
Lobster and crab sauces – add the chopped flesh plus some Cayenne pepper. If the lobster was a lady lobster with roe, then pass it through a sieve into the sauce.
Anchovy sauce – add some anchovy essence.
Herb sauce – add plenty of chopped herbs to the sauce near the end of cooking. For larger herbs like sorrel and spinach, steam and chop them before adding them to the sauce.
For the sauce I made, I didn’t want to chop the lobster up, so I stirred in the brown meat (which people think is inedible because of its consistency, but it is delicious) and some chopped parsley and provided it in a jug to be poured over the lobster halves.

Check out the fancy lobster tools!

#272 Melted Butter. I really like this surprisingly light sauce and it complimented the lobster brilliantly. Plus it was much easier than a sauce hollandaise – one didn’t have to stand next it hoping it wouldn’t split. I imagine it would be good to serve with fish, potatoes and asparagus for a Sunday lunch in the summertime. A definite winner this one.

Wednesday, February 2, 2011

#271 How To Boil Crabs, Lobsters, Prawns and Shrimps

A woman should never been seen eating and drinking, unless it be lobster and Champagne, the only true feminine and becoming viands.
Lord Byron 1788-1824
A freshly boiled crab or lobster is the most delicious crab or lobster. Apparently. In England, this is not something that commonly happens in a typical household. Like all our meat and fish, the animals that provide us with all that delicious protein are helpfully done away with by burly men in abattoirs, boats or warehouses.  We have lost touch with our food rather and find the idea of killing an animal for food ourselves distasteful. Pretending this doesn’t happen, in my opinion, is the distasteful act.
That said, I am not actually comfortable myself with killing animals, and as any previous reader of the blog will know, killing three eels was most distressing for me. Now it is the turn of some shellfish. This recipe is one that I never did back in England because I simply never saw live crabs and lobsters, prawns or shrimps in fishmongers. Houston, however, is a very different state-of-affairs. There’s live seafood in pretty much any supermarket you walk into here.
The lobster tank in Central Market, Houston

So if you stumble upon a live crab or lobster in the local fishmonger or supermarket here is what to do. Well, as you’ll find out, it maybe isn’t what you are meant to do….
The main point I wanted to get across is that boiling seafood can be humane (or at least no more or less humane than, say, killing a cow with a stun-gun). In English Food, Jane Grigson says that RSPCA guidelines suggest putting the animal in cold salted water and letting the water heat up – apparently when a certain temperature is reached, the creature expires ‘without suffering’. Guidelines have changed rather and nowadays it’s suggested that the little arthropod is popped into the freezer until it falls into a torpor. When plunged into the water, it’s dead before it has a chance to wake up. (The other method is to stab it in the top of the head using a sharp knife and a mallet.)
So, first things first, my mate Danny (who was helping me out with the cooking) got a lobster from Central Market. On the fishmonger chap fishing out the one we chose, I suddenly felt a pang of guilt, so we hurried to my freezer to get it nice and sleepy. Whilst we waited, the salt water into which it was boiled needed to be prepared. The water needs to be very salty. If you can, use sea water, if not dissolve enough sea salt so that the briny solution will bear an egg (this requires a lot of salt). Bring to the boil.
I was informed that the lobster would take 20 minutes or so to fall asleep. This was total nonsense, because 90 minutes later it was still moving around. Shit. By now we’d had a fair few glasses of wine due to the stress. A little later, the lobster seemed pretty inert, so we decided this was the time. Like, I said before, the idea of this post was to do away with some misconceptions about killing seafood in boiling water. So sure I was of this, I filmed the process, so you get a rare glimpse of me in action! Unfortunately things didn’t quite go to plan, and I may have reinforced those misconceptions. Oh dear.


Next time (if there is a next time) I’ll just throw the thing straight in!
Okay, back to the cooking. The cooking time is 15 minutes simmering for the first pound and then an additional 10 minutes for every extra pound.
For shrimp and prawns: 3 minutes for large prawns and for small shrimps, simply let the water come up to the boil again and they’ll be done.
Serve the shellfish simply, says Griggers, with brown bread, butter and lemon wedges.
#171 How to Boil Crabs, Lobsters, Prawns and Shrimps. Well that was an event! Aside from the auto-dismemberment episode, the cooking itself went very well. I split the lobster lengthways, removed the brown meat and used it to make a butter sauce (see next entry, when I write it!), and grilled the lobster with butter briefly. Delicious. 8.5/10.